the butter lab's pie dough

Pie dough is tricky. Maybe that's why pie dough recipes are so often about tricks and shortcuts—vodka, food processing, letter-folding. It's not that these don’t work; it’s just that they’re missing the point. The only secret to perfect pie dough is knowing how to make pie dough. That might sound like a bummer, and I might sound like a smug crusty killjoy, but I promise this is good news.
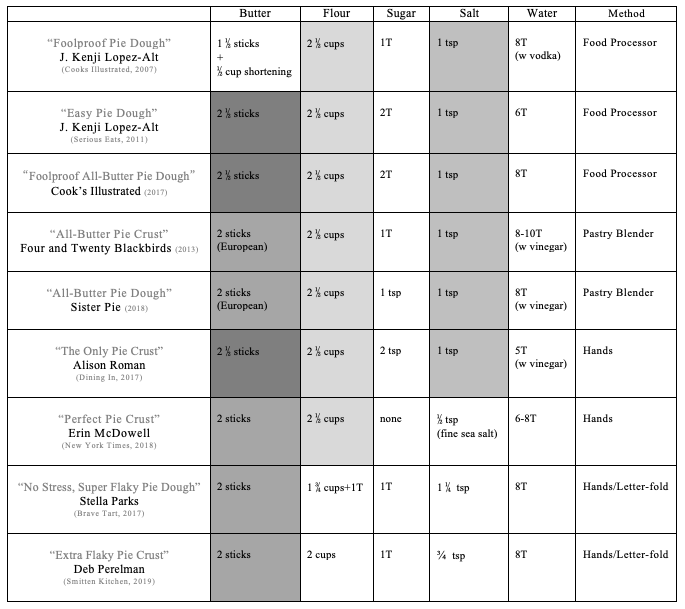
Pie dough is just a combination of five things: butter, flour, sugar, salt, and water. In 2007, J. Kenji López-Alt developed “Foolproof Pie Dough,” a recipe for Cook’s Illustrated in which he famously substituted vodka for some of the water (and vegetable shortening for some of the butter). The vodka minimized gluten formation, ensuring a tender crust; the vegetable shortening, while short on flavor, provided extra insurance for both tenderness and flakiness; and the recipe’s quirky food-processor mixing method made the entire pie-making process more consistent and less execution-dependent.
The vodka part got all the attention, which surprised Kenji; to him, the mixing method was the bigger trick. In 2011, he updated his original recipe on Serious Eats. The new recipe, “Easy Pie Dough,” abandoned both the vodka and the vegetable shortening (which pretty much no one wanted to be associated with anymore), but kept the 2007 mixing method. In 2017, Cook’s Illustrated similarly updated the original; they too declared the vodka was overhyped, fell in line behind an all-butter crust, and kept the food-processor method intact.
Around that same time, Stella Parks entered the game with a Kenji-approved pie crust, an “old-fashioned” alternative to his food-processor method. Stella encouraged bakers to not be afraid of gluten formation; the increased butter-to-flour ratio and the extra liquid in her recipe would yield a strong, pliable dough that wasn’t tough. Plus, a special letter-folding trick would ensure extra-flaky layers. Like the food-processor method, Stella’s still promised to take the guesswork out of pie-making. No need to worry about “coarse meal” crumbs or “pea-sized” bits! Her latest version, “No-Stress, Super Flaky Pie Dough,” has since gained the favor of both Kristen Miglore and, more recently, Deb Perelman.
It’s not that these recipes don’t work. I’m just not convinced that these shortcuts and tricks are doing us any favors. I don’t even think that they’re making things quicker or simpler. To me, these “foolproof,” “easy,” “no-stress” approaches are symptoms of a capitalistic food media culture whose refrain is the disingenuous, breathless hyperpromising of a sales department: You Don’t Have To Think(!) Or Even Work(!) To Get Rich Quick (in your kitchen).
But mostly I just care about pie. I know I sound old-fashioned, but when it comes to pies, or pretty much anything else, I’m a fan of attention and judgment. Knowing what you’re looking for—how the dough should look and feel at each stage—builds a kind of flavor and texture that’s difficult (and arguably more effortful) to achieve otherwise.
This recipe is an attempt to detail those visual and tactile benchmarks. It’s also a conglomerate of recipes that I like. The method, which uses a pastry blender, is mostly adapted from the Elsen sisters of Four and Twenty Blackbirds fame. They have, predictably, a thorough and traditional approach; I’ve added some extra cues for clarity, including their own verbal cues from this helpful go-along Panna video. I’ve also added a little safeguard maneuver that I call “making it rain.” (Alison Roman says “running your fingers through your hair.”)
In terms of ingredient quantities, there’s actually not as much variation as it seems. To prove it, I’ve charted out the ingredient lists from the recipes above, along with others I’ve recently considered. Most call for either a 1:1 or 1:1.5 (2:3) ratio of sticks butter to cups flour. Even the ratio in Stella’s admittedly left-field recipe has only a couple of tablespoons less flour than the 1:1 norm. The supporting characters—sugar, which mostly aids in browning, and salt—are, unsurprisingly, a bit more variable. As is the amount of water, which is crucial, but hinges on many recipe factors; I still think seeing the range is useful.
For a double-crust pie.
I’ve found that my overall preference is for Kenji’s 2011 ingredient profile, with the following sub-preferences. Using: 1) European butter—which has higher butterfat and lower water content—for additional flakiness and flavor; 2) a low-protein flour like Gold Medal to minimize gluten formation; and 3) a splash of apple cider vinegar which is rumored to help relax the gluten, but most likely just adds some tang, which I like.
This recipe puts all of that together. My hope is that, wherever you are, it provides some meaningful guidance and adds some thoughtful intuition to pie-making play and inquiry. I’m not going to say it’s the perfect pie dough for everyone. But it is for me.

1. Butter cubes tossed with flour

2. Coarse-meal pieces after using pastry blender

3. Coarse-meal pieces, detail

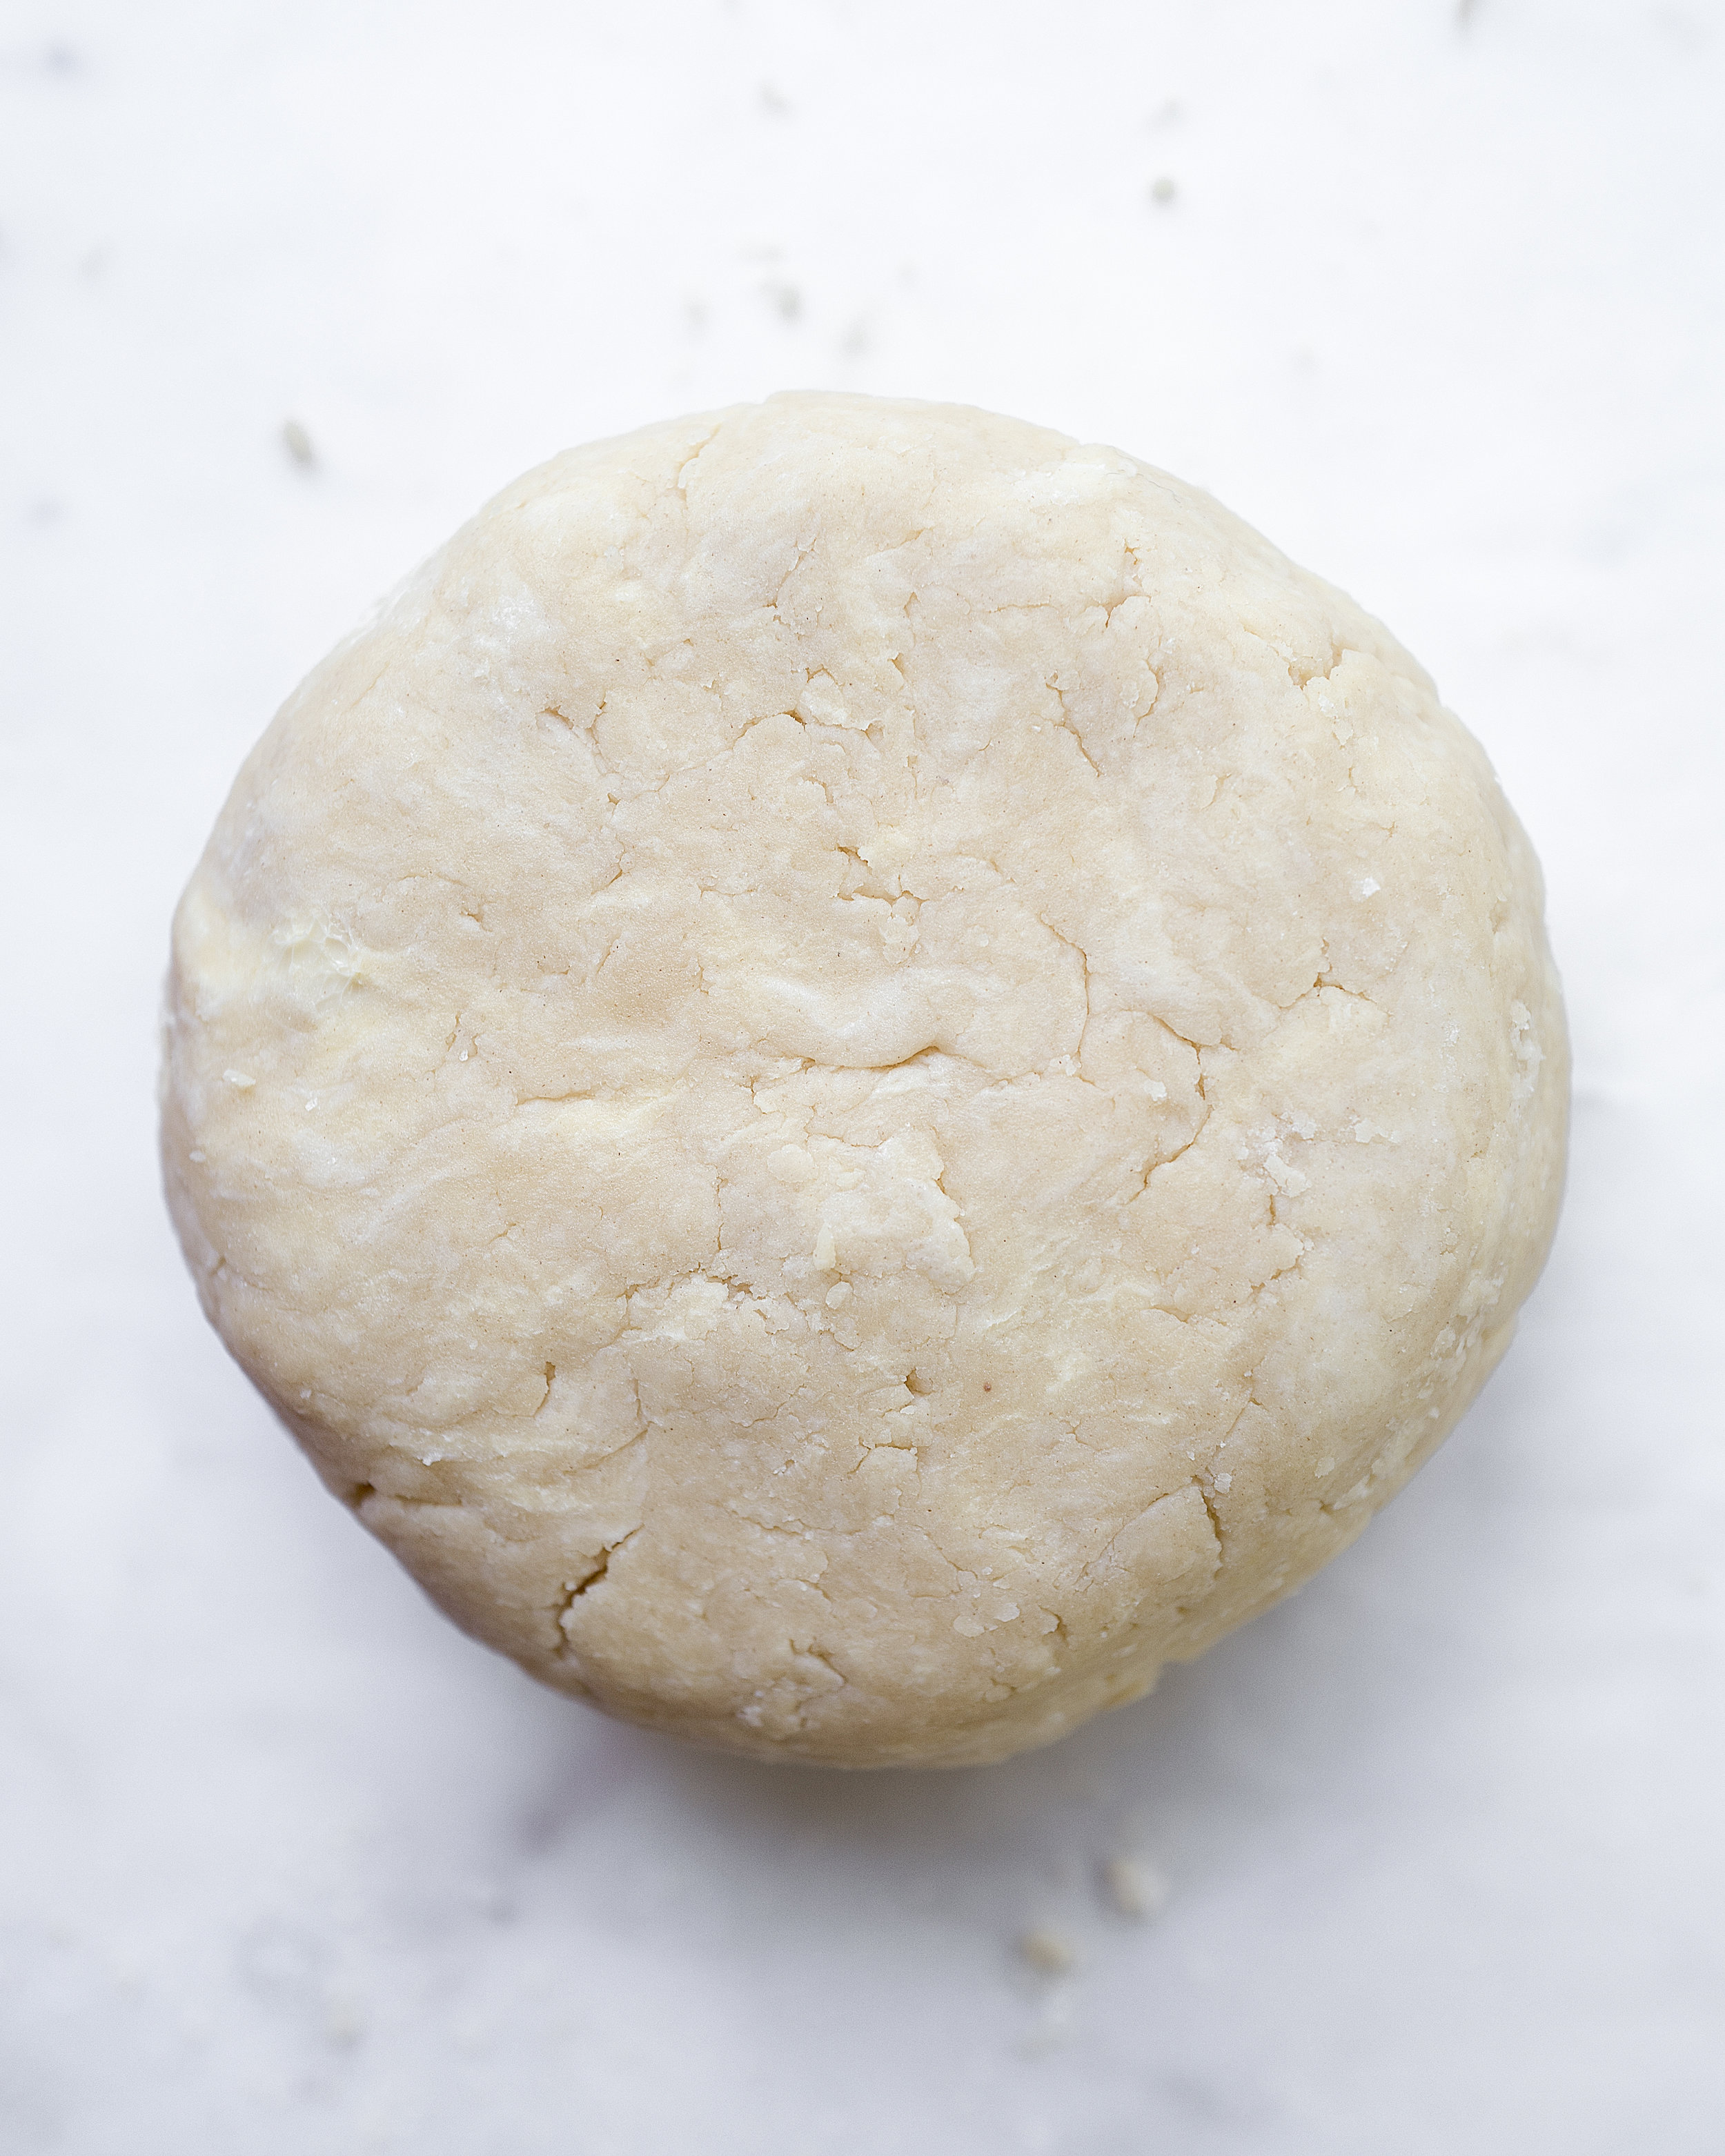
5. Fully hydrated dough

4. Checking hydration
6. Fully hydrated dough, halved and formed into a disk
The Butter Lab’s Pie Dough
Makes enough for one double-crust 9-inch pie.
INGREDIENTS
2 1/2 sticks (284 grams) cold unsalted butter, preferably European (with 82% fat) like Kerry Gold or Plugra
2 1/2 cups (355 grams) all-purpose flour, preferably a low-protein flour like Gold Medal
2 tablespoons sugar
1 teaspoon salt
7-10 tablespoons liquid from mixture of 1 cup cold water, 1/2 cup ice, and 1 tablespoon apple cider vinegar
METHOD
PREPARE BUTTER: Cut butter, straight from the fridge, into 1/2-inch cubes using a bench scraper (if you have one) or a sharp knife. If butter sticks or begins to "sweat," dust the bench scraper lightly with flour. Return butter cubes to the fridge while you prepare the dry ingredients.
CUT BUTTER INTO FLOUR MIXTURE: Measure and combine flour, sugar, and salt in a large, flat-bottomed bowl. Add the butter cubes and use your fingers to toss them, coating the individual pieces with the flour mixture (FIGURE 1). Use a pastry blender to cut the butter into the flour. Use firm, straight strokes; do not smash or smear the butter. Periodically scrape off the butter from the pastry blender, and gently run your fingers through everything a few times, from the bottom of the bowl upward, as if you were making it rain or running your fingers through your hair. This will help distribute the butter, but also help you gauge where you are in the process. Stop when the butter resembles a course crumble with only a few larger pieces, looks pale yellow, and feels light and soft when you make it rain (FIGURES 2,3). (An over-mixed dough will feel heavy and look bright yellow or greasy. This is what you are fastidiously trying to avoid.) If at any point the butter becomes too soft to work with, place the entire bowl in the refrigerator until the butter firms up, 2-5 minutes.
HYDRATE AND FORM DOUGH: In a 2-cup liquid measuring cup, mix 1 cup cold water, 1/2 cup ice, and 1 tablespoon apple cider vinegar. Sprinkle 4 tablespoons of this liquid over the flour mixture. Make it rain with your hands to gently incorporate the liquid. Now, squeeze a fistful of dough and poke it with your other hand. The dough will break apart since, at this point, it requires more water; note how easily it falls apart. (This is your starting point in the game of Making Sure Your Dough is Properly Hydrated.) Add more water, 1 tablespoon at a time, making it rain after each tablespoon to incorporate the liquid and checking the hydration by squeezing a fistful. The dough is ready when it holds together, like wet sand, when poked (FIGURES 4,5). Use your hands to gently pat it until it just comes together. (Kneading it develops the gluten which you want to minimize for pie dough). As you squeeze it together, the dough will want to stay together. It will look shaggy, but feel soft and velvety. It should not be shiny or smooth. Turn dough onto a work surface, form into a log, and use your bench scraper to divide it in half. Shape each half into a flat disk and double wrap each disk in plastic wrap (FIGURE 6). Refrigerate for at least 2 hours, preferably overnight, or up to 3 days. Dough can be frozen, well-wrapped, for up to a month.
TO ROLL OUT DOUGH: Generously grease a 9-inch pie dish with butter. Lightly flour a work surface and a rolling pin. Place one chilled pie disk on the work surface; dust with additional flour. Flatten the disk by pressing the rolling pin down at the center of the dough. Rotate the dough and repeat until it’s evenly flattened. Begin to roll the dough outward to make a circle, rotating the dough a quarter-turn at a time to keep it even and adding more flour as needed. (If the dough becomes too soft, chill until firm, 2-5 minutes.) Roll the dough until it’s about 2-3 inches larger than the pie dish, all the way around (overturn your pie dish onto the dough to check). Trim away the rough edges with a pizza cutter. Save the scraps to make pie crust cookies or if you want to incorporate them as additional lattice strips. Loosely wrap the dough around the rolling pin to help you transfer it into the pie dish. Chill the pie dish in the refrigerator for a couple minutes before pressing the dough to fit the pan, lifting around the edges to prevent stretching. Refrigerate while you prepare the second disk for a double crust or jump to the directions for a single crust pie below.
FOR A DOUBLE CRUST PIE: Roll out the second disk the same way you did the first. For a lattice top, use a pizza cutter to square off the dough, trimming the left and right edges. Then cut the dough into 8 even strips (cutting dough in half, each half in half, and each fourth in half ( =math) ). Transfer top crust/lattice strips to baking sheet and chill in the refrigerator, along with bottom crust, for 30 minutes. When filling is ready, fill the bottom crust and place top crust over filling, weaving lattice if using. Trim the top crust if necessary so that it extends a little wider than the edge of the pan (~1 inch) . Now crimp: In one place, firmly pinch the edges of the top and bottom crusts together and roll them tightly up over itself and inward until the roll sits directly on top of the pan’s rim, all the way around. Use your thumb and index of one hand and the thumb of your other hand to squeeze a letter “C” all around the dough rim.
FOR A SINGLE CRUST PIE: Firmly roll the single pie dough edge under itself and inward until the roll sits directly on top of the pan’s rim. Use your thumb and index of one hand and the thumb of your other hand to squeeze a letter “C” all around the dough rim. Chill for 30 minutes before using.
PAR-BAKING AND BLIND-BAKING: To par-bake a single pie crust that will be filled and baked again later: Use a fork to prick the bottom and sides of the chilled, rolled-out, and crimped dough. Place in the freezer for 10 minutes. Line the dough with parchment paper and fill with dried beans, granulated sugar, or pie weights. Bake at 425°F on a baking sheet on the bottom rack for 17-20 minutes, until the edge just begins to brown. Remove the parchment paper and brush the dough with one egg white whisked with one teaspoon water. Return to the middle rack and bake for 3-5 minutes more. To blind-bake a single pie crust that will not be baked again later: Do the same as above, except fully bake the crust for 10-12 minutes once the parchment is removed and wait until the final minute of baking to brush with egg wash.